varotone
-
Posts
211 -
Joined
-
Last visited
-
Days Won
8
Content Type
Profiles
Forums
Events
Blogs
Gallery
Everything posted by varotone
-
I want to fix the rusted out area in front of the dashboard before re-fixing the dashboard. Got down a tinkerer and he said the fenders and windshield may need to be removed to get access to the area. So this is not simple as it sounds and I think about expediting the project and doing all the tinkering and painting at this point. Please comment on how much would it cost for tinkering and painting of the whole car. I understand that the cost depends on the condition of my car, but I'm clueless about the cost of painting and tinkering. So please give me an estimate for how much I should expect to pay. My plan is to do hire a tinkerer and repair the rust and do the tinkering at home. I'm not going to get it done at some fancy garage. But I prefer to use a fancy painting booth for painting. UPDATE I was quoted Rs. 180,000 for the tinkering only including materials.
-
Thank you very much for the help. Here's a picture of the alternator. It has 3 wires. One thick wire (2mm, disconnect in the photo) for Battery+. Other two are thin (0.5mm) wires via a connector. Difficult to disconnect the connector in a hurry. I'll try it tomorrow and check where the wires go to. I'm fairly certain that the alternator has been replaced with one with a built-in voltage regulator. The free wires must be for the voltage regulator which is obsolete now. These wires are right next to the alternator long enough to reach the right side shock absorber mounts. The two thin wires connected must be for battery sensor currently for stator coils and another for battery indicator on the dashboard. I certainly need a qualified auto electrician. But looking at the quality of the electrical repairs done on this, I'm having second thoughts about them. I'm taking my time and fixing the wiring properly by soldering the splices and using insulation tubing and replacing damaged wires. I'm not sure if the mechanics would do it up to my expectations. Besides, the experts here at AL are very helpful and I may be able to do it without a mechanic?.
-
HELP NEEDED 1. Did this car come with a voltage regulator? If yes, where was it mounted? 2. This is a photo of what I think the oil pressure sensor. Am I correct? If not where do I find the oil pressure sensor? 3. I'm seeing 3 faily thick (3mm) wires without any connections. It was just dangling from the wire loom. Can anybody identify what these are for? I couldn't find where these lead to. Thanks in advance for your help.
-
Thanks for the input gentlemen. Osram nightbreakers looks awesome from the photos. Browsed through the products and found all of them are in the 5000-6000K color temperature. The bluish light will not give the age appropriate looks for the car. Something more towards red in the spectrum (around 3000K color temperature) would be more suitable. Wire and relay upgrade kit costs around RS. 2000. So, I'm planning on buying one. I do want a perfect restoration without cutting corners. For now I'll fix the same old sealed beam halogens wired through the relay. When money fairy visits me again I'll upgrade to a LED/Xenon one. Investing on a conversation kit would be well worth the money in the long run. I was referring to the reddish, filament bulb like color when I said red color bulbs. The color is also called warm but in fact it is a cooler color because it corresponds to black body radiation at 3000K. The bluish ones like the night breakers corresponds to 6000K. A much warmer back body. I'm sorry if I caused some confusion by calling a color 'cool'. (Excuse the geek in me ?) I'm pretty sure Sri Lanka doesn't regulate the color temperature of the headlights. Please correct me if I'm wrong.
-
ADVICE NEEDED After a thorough inspection, my conclusion is that this particular car did not have a factory fitted headlight relay. (I find it difficult to believe, but still, I'm convinced that the wiring was not hacked to that extent). I plan to fit one of those "headlights upgrade wiring kit" made for LED/Halogen ones and fix the existing sealed beam ones for now. The plan is to upgrade to a cooler color LED or halogens later to keep the vintage appearance and easy serviceability later after the tinkering and painting. Appreciate the input from the AL "Light fetish club" @tiv @PreseaLover @Magnum before I go ahead with the purchase and modifications.
-
Was it one relay for both high beams and another for both low beams? The wires supplying the headlights itself is too thin IMO. So, even if there was a relay in the dash, there would be a significant voltage drop at the connector for headlight. A relay right behind the headlights would work. The wiring for headlights doesn't look like it was hacked. I still wonder if this particular car didn't have a relay. Bulbs are consumables. So I'll have to replace them at some point when they are blown. Sealed beams are old and may be difficult to find in the future. A cooler (reddish) LED would have the vintage appearance while being easy to find spares for. I'm not thinking about lights so bright that blind the on coming traffic. Hope the cops won't be bothered.
-
HELP NEEDED The headlight (both the low and high beam) pulls power directly from the fuse box. Both are wired with a 20 SAE wire without a relay. A pair of 50W bubs exceeds the maximum rated current (8 A) when wired this way. This worries me. Besides, the schematics in the Haynes manual shows wiring through a relay. Can anyone please tell how was it wired originally? (Wiring schematics given in the Haynes manual differs a little from what is in my car. So, I can't follow the manual to the letter. I'm currently drawing the schematics as found in my car) Afterthought Are there kits to replace the sealed beam headlight with an LED one? Switching to LED would pull lesser power.
-
Thanks for the detailed and quick reply! Not when I bought the car. It used to stall when I kept the engine on idle and switched on the AC. Now the engine revs up a little when AC is on and the car no longer stalls.
-
UPDATES Finally managed to restore the switch assembly on the steering wheel. Rear wire harness was restored. Had to replace the wires to the door switches. Switches themselves were working. Took longer than expected to undo all the thoughtless butchering by the previous owner. Next up is the front wiring. HELP NEEDED Can anybody identify what this is? It has two tubes and two wires connected.
-
UPDATES Took apart the steering wheel and tried to fix the butchered wiring. Managed to get the switches working except for the PASS switch. So, I'm thinking about buying the whole switch stalk assembly. Shopping list: 1. Hazard light relay 2. Connector for hazard light relay 3. Headlight relay 4. Connector for headlight relay 5. Switch stalk assembly Appreciate if you could tell me where to find these and the approximate cost. There's a light named DOOR in the dash. But the slot for the bulb is sealed from outside. There are switches in the door jambs. But the wires are missing. EDIT: Looked around for the switch assembly. Came across 2 reconditioned ones. None of them had all the switches functional. So don't buy it. Next would be to look in panchi or delkanda.
-
The manual describes some features like 'hold speed function' a rudimentary cruise control, seat belt warning chime, high speed warning chime, EGR, shock absorbing buffer attachments, and door open light. Are these features available in this particular one? YOM 1983 JDM version. Lookslike the Japanese automotive technology had achieved everything in that era (looks like today's cars just throwed in a bunch of electronics to just complicate an already existing, simple setup)
-
A very big thank you to @Davy for buying a Haynes manual for me. When I mentioned that I want to buy a workshop manual, he was very helpful in dropping me a PM about this manual being up for sale and offered to buy it for me. He even said that I can pay after I had received it! Davy is by far the most helpful person that I have met online. Sir, I don't know how to thank you enough for this favor. It's an unused Haynes manual. If anyone needs a photo copy, drop me a PM.
- 189 replies
-
- 4
-

-
- mitsubishi
- a72v
- (and 7 more)
-
UPDATES Our garages are notorious for cutting the wiring just because they are too lazy to properly remove them. Mine has also suffered the same damage. Instead of buying a reconditioned harness, I decided to restore it myself. I spliced one connection today. Here's the steps briefly. 1. Clean the area. You'll see the color coded wires, any damages well, and helps the solder and insulation tapes to stick well. 2. Figure out which wires go where. Note it down in a paper or label the wires with masking tape 3. Cut the frayed ends and strip the insulation. 4. Tin the wire ends. (Tinning means to coat the wire with soldering lead) 5. Slip in a piece of heat shrink tubing 6. Solder the ends. 7. Cover the splice with the heat shrink tubing. Heat it up. 8. Wra the wires with insulation tape. Remember this insulation tape is not actually meant to insulate the wires. The heat shrink sleeve should do the insulation. Wrap the insulation tape to keep the wires organized and tidy. 9. Check the resistance across the splice and for short circuits with nearby wires. Here's how the damage before repair. This is the result
- 189 replies
-
- 1
-
-
- mitsubishi
- a72v
- (and 7 more)
-
Some electronics shops have new terminals. But they don't fit mine. They look flimsy too. If I'm buying them, I'll have to get both male and female ones. Thanks for the info. I'll look at Japanese reconditioned parts shops. I'm not at all worried about the milage. It would be nice to know how many times the car could have traveled back and forth to the moon!?
-
17,346.3 to be precise. It has only 5 digits. I wonder how many times it could have hit 99,999.9 (Or how many times it was reversed) ?
- 189 replies
-
- 1
-
-
- mitsubishi
- a72v
- (and 7 more)
-
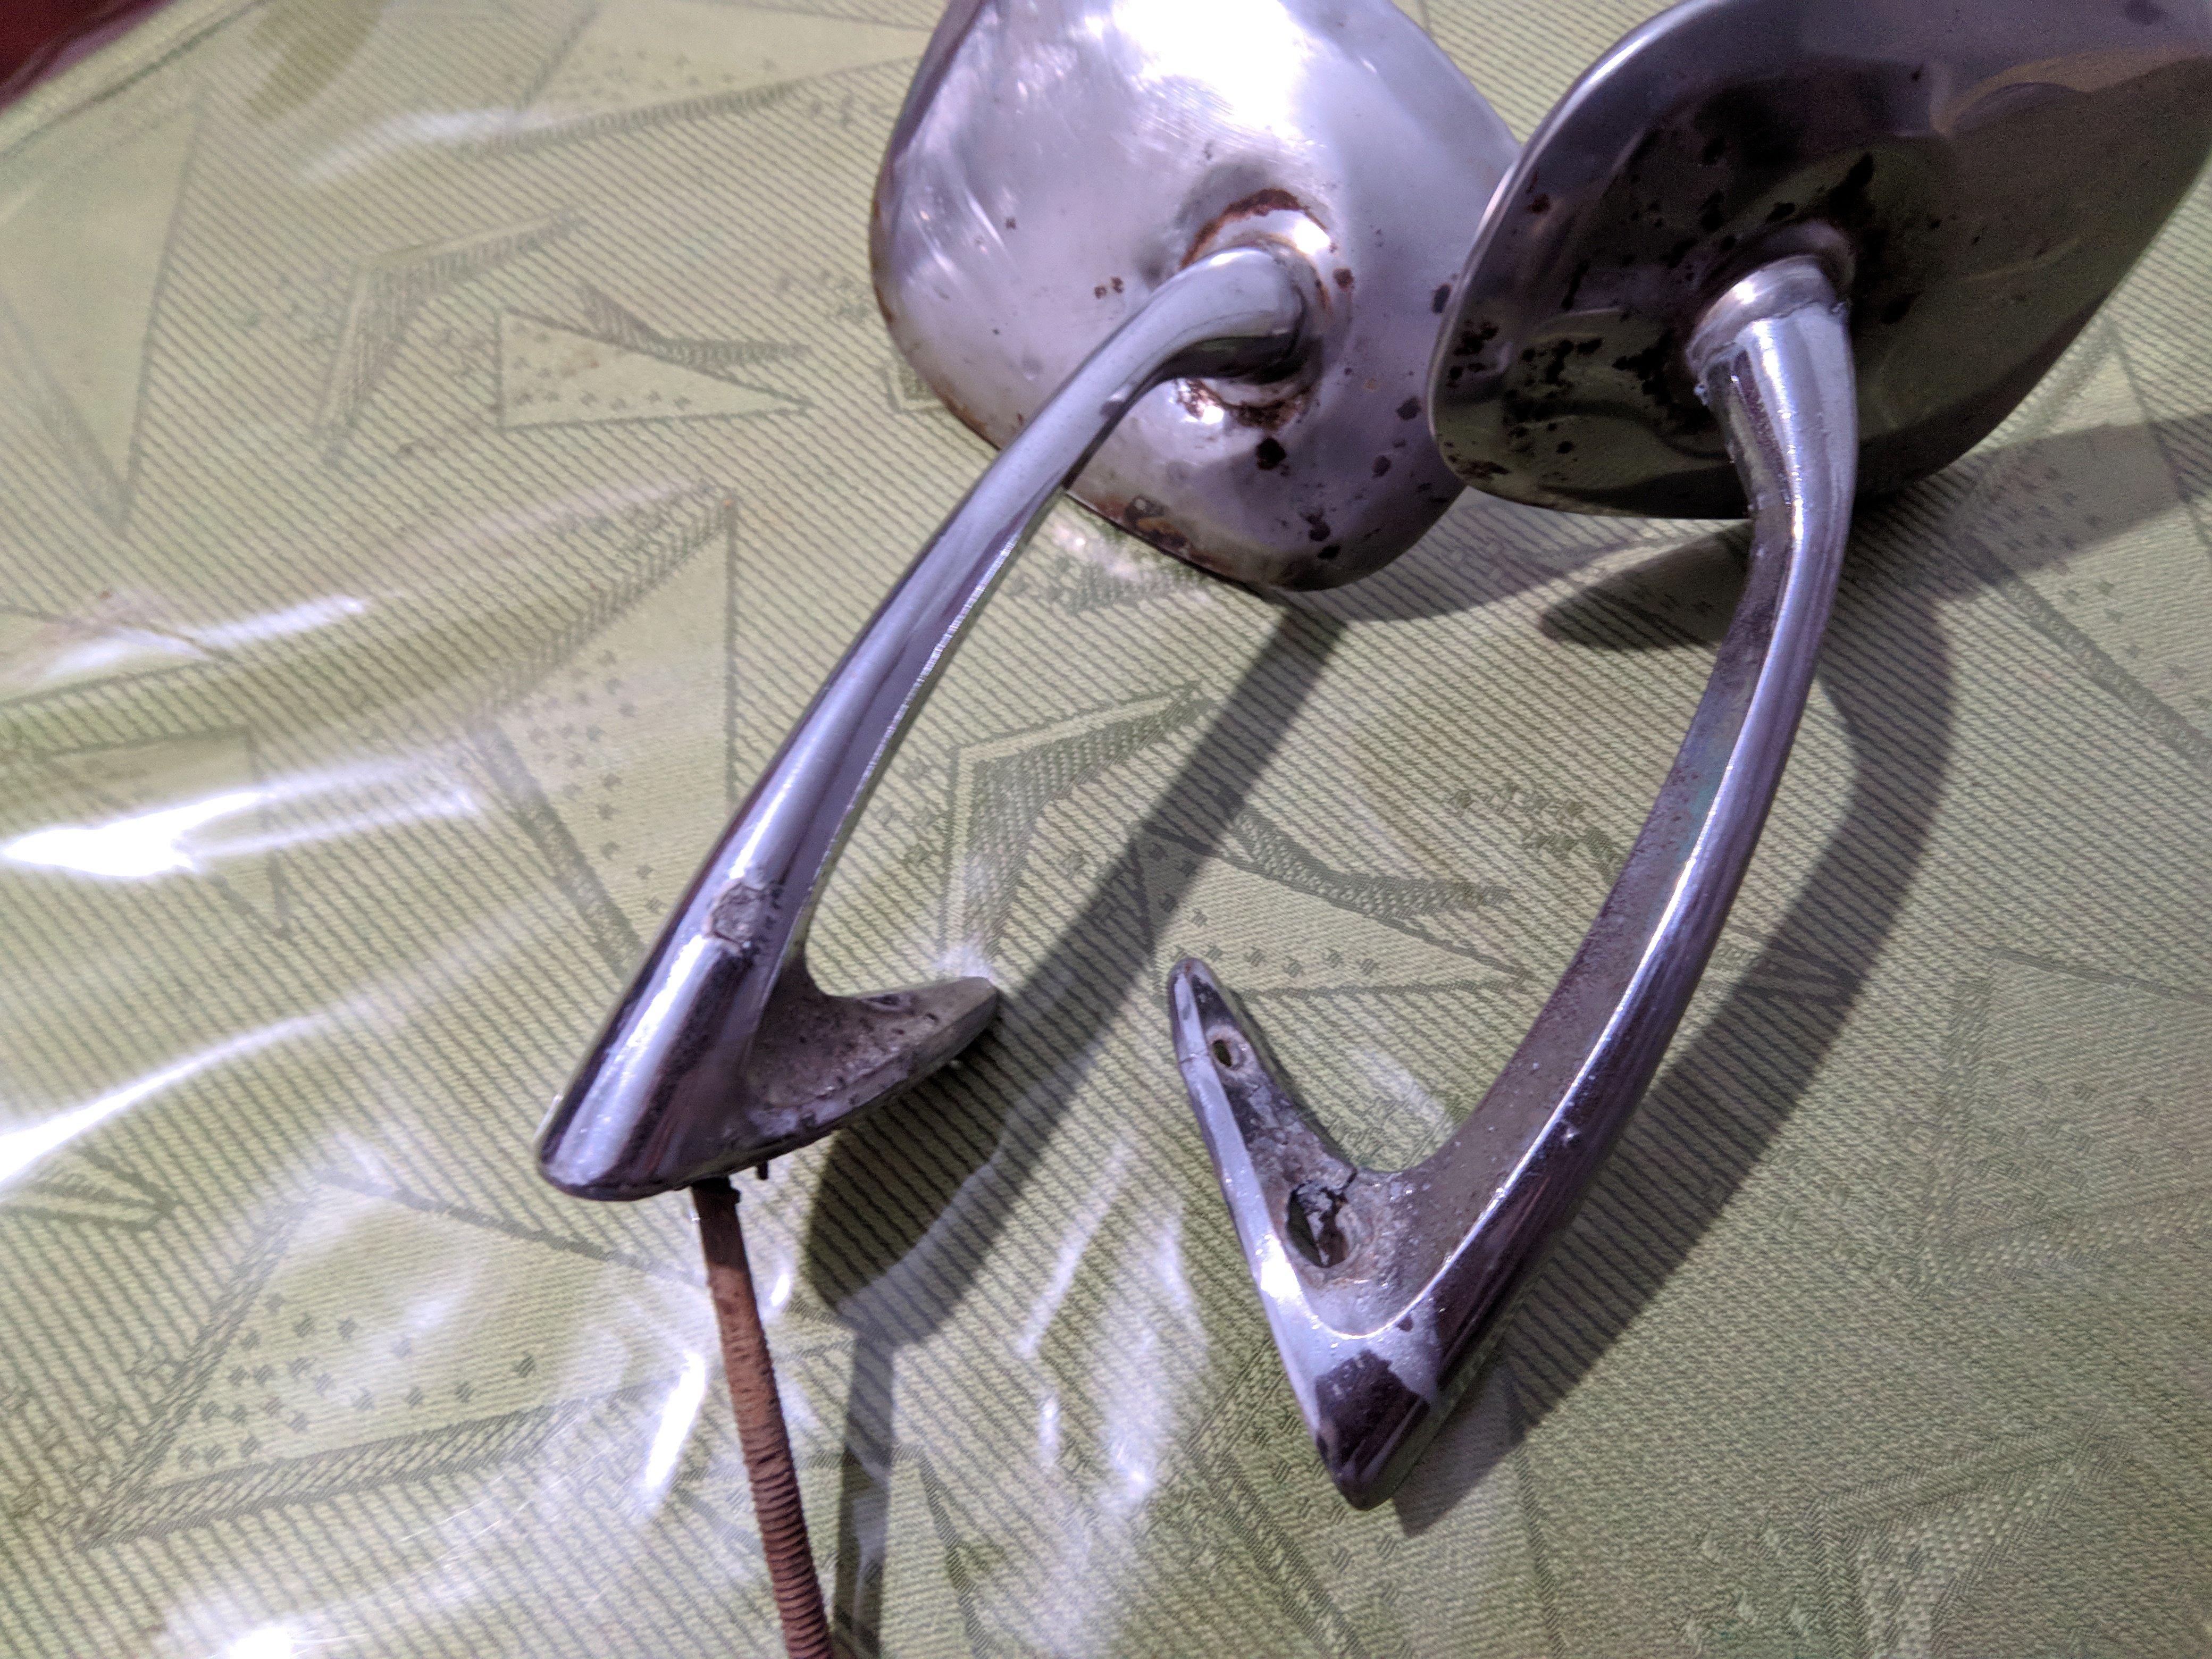
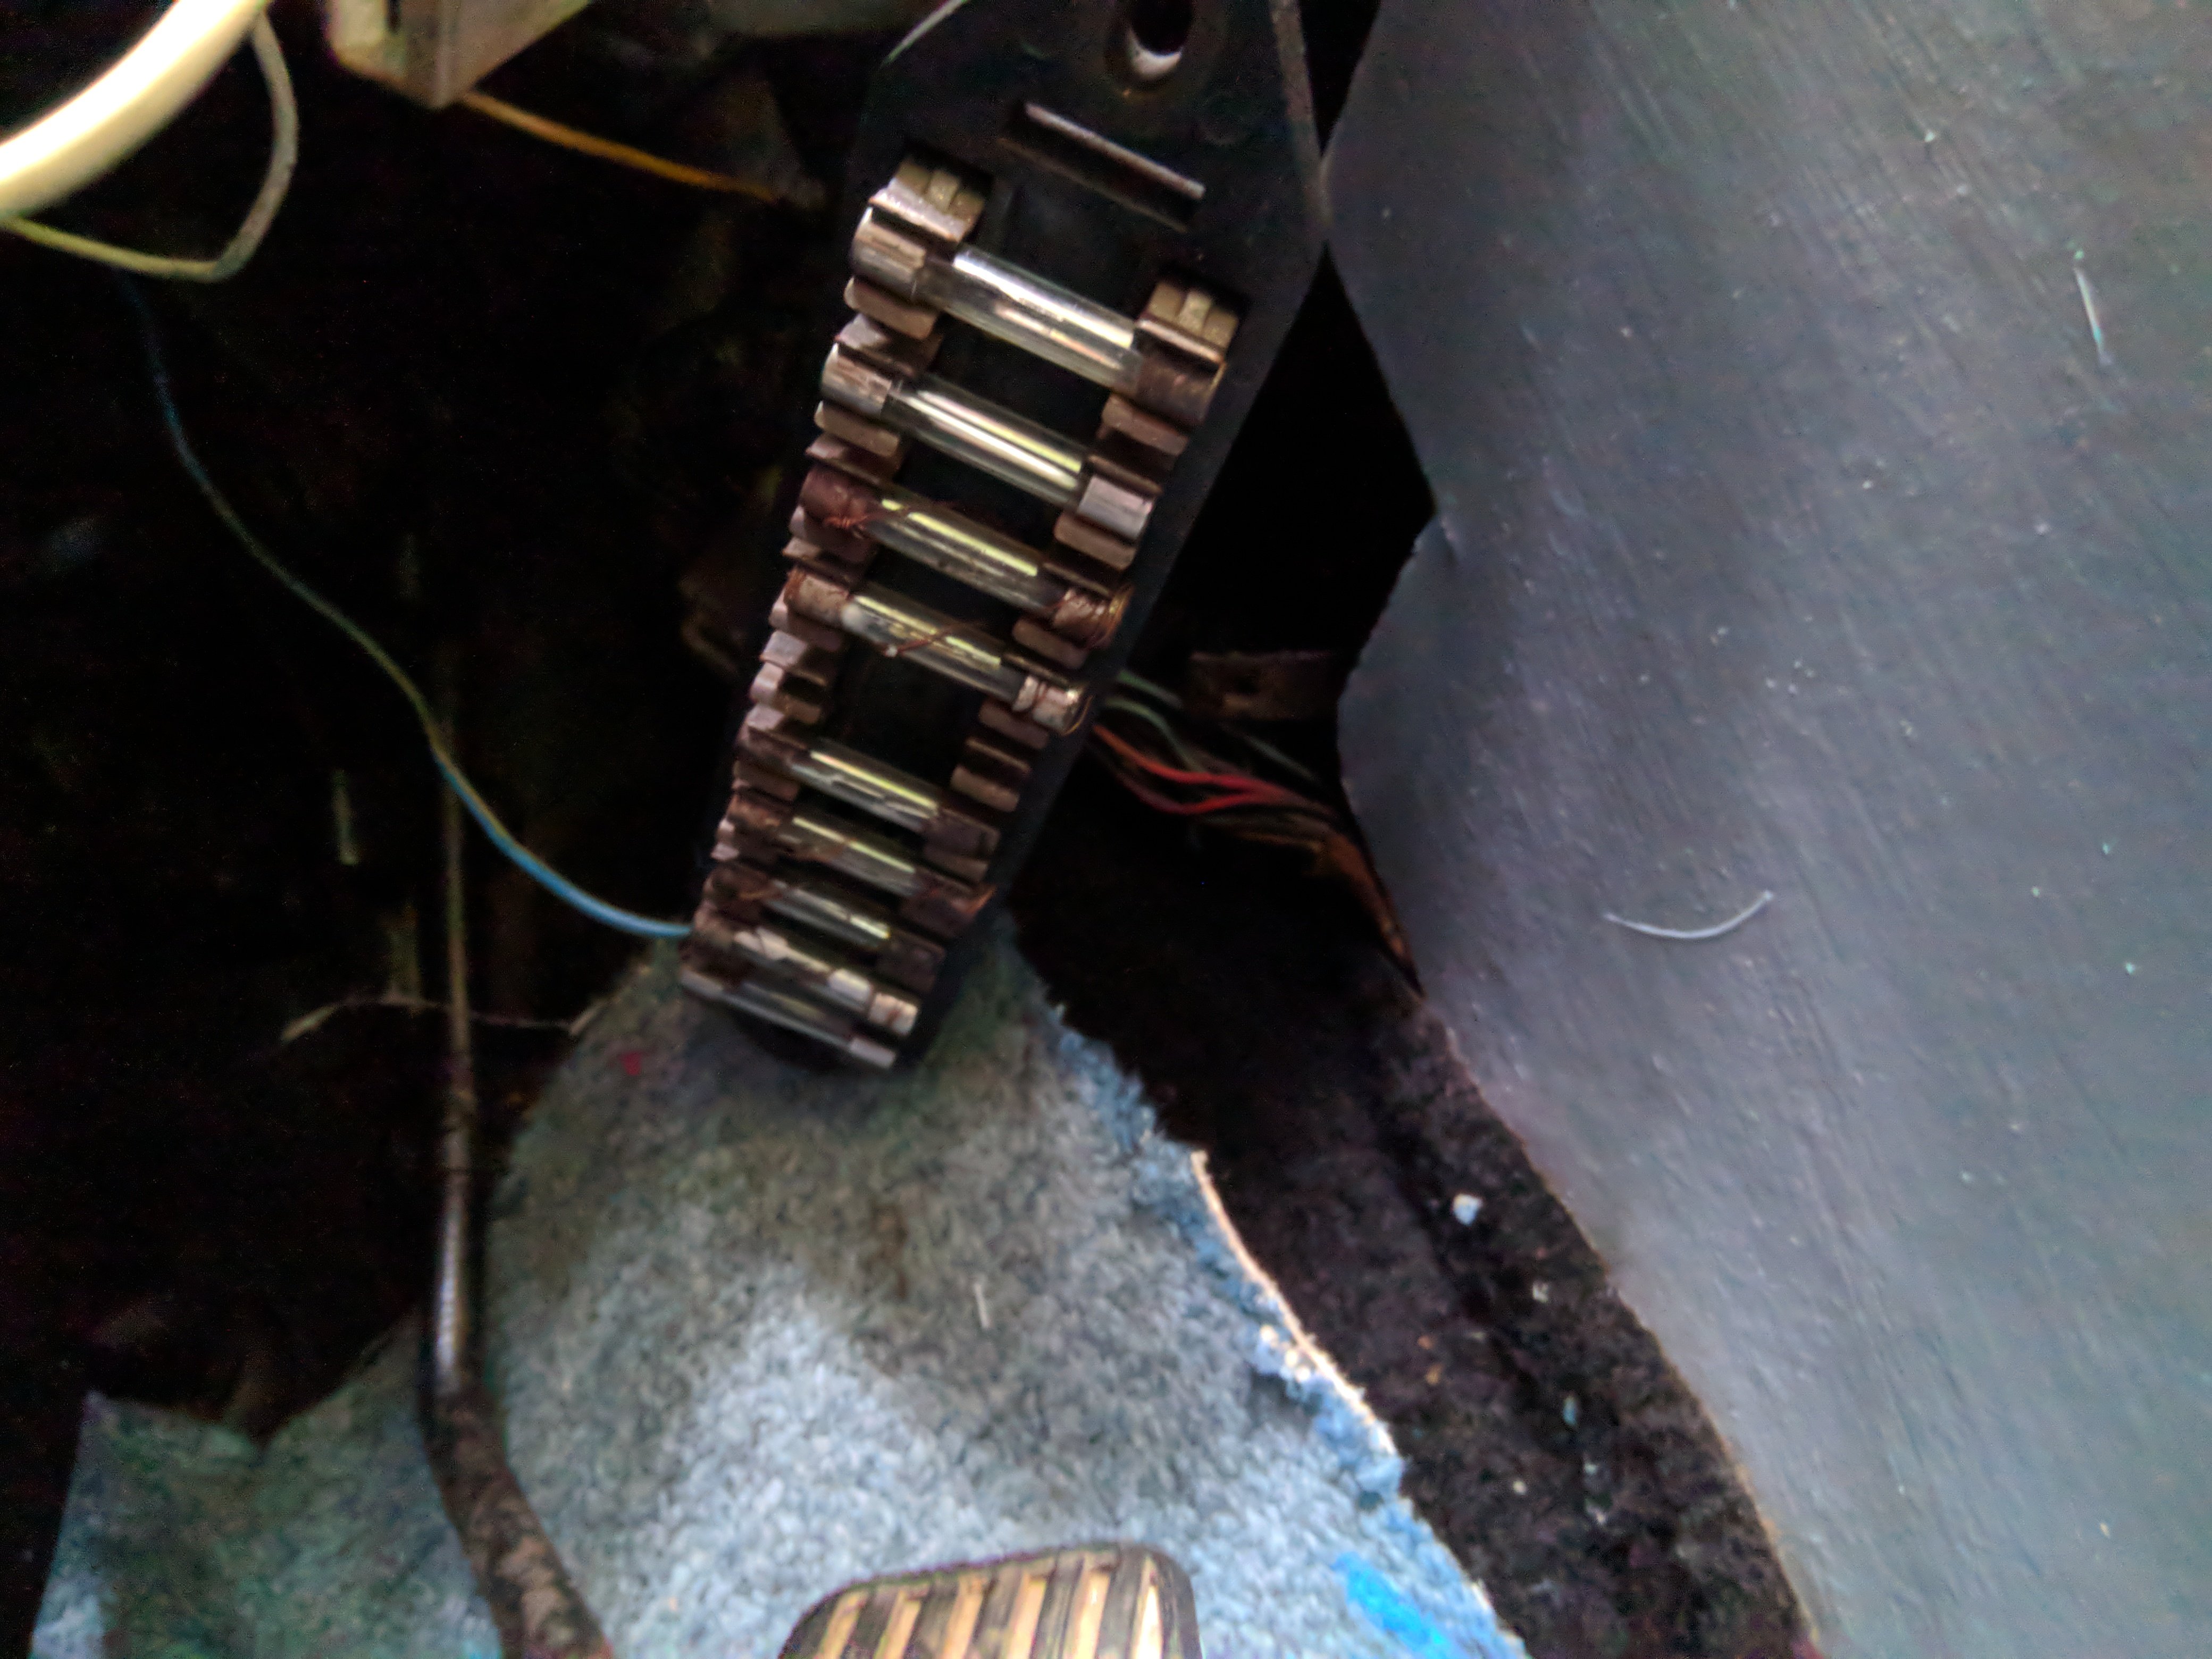
UPDATES 1. Removed the fender mirrors. Both need some buffing. The passenger side one needs some restoration because the spring mechanism has failed and someone had drilled a hole and fixed the mirror with a bolt. Here's a pic. I want to fill out the hole and restore the spring mechanism. Metal looks like pewter. I'm searching for some blacksmith/jeweler kind of guy to fix it. If it fails I'll hut for new fender mirrors. 2. Removed the dashboard. The wiring is a mess. There were aftermarket lights in the front shell. The wiring was hacked to install it. That's why I couldn't remove it the other day. Now I'll have to check the meters and lights of the dashboard. Waiting for the Haynes manual to get the specs. 3. Replaced the fuse. Although they were shorted out, none of them except the 5th blew up. Maybe it needs a higher amperage. Didn't have enough time to hook up the multimeter and see how much current it draws. 4. Dissembled the AC/heating/ventilation gadgets because only the AC and blower were working. Will take a look them stepwise. BTW, where can I find connector terminals?

-
Had a look at the ignition switch. Here's the connector. Exactly as @Davy described. But the key barrel looks alright. Here's a pic of the fuse board just to show how messed up the electrical system is.


-
UPDATES Took the car out for a spin today and noticed 2 issues. 1. The passenger side carpet was wet. Yes, it was a rainy day but I'm sure there are no rusted out holes in the floor pans or the gutter going down for the windshield. The ac condensation drain line was missing and I realized it only today! No big deal. Just used a piece of PVC tubing. Will have to wait until next weekend to see how it holds up. 2. The key was heated after the ride. Only cranked the engine once and it started without trouble. What could be drawing a current from the ignition switch other than the starter motor?
-
Thanks for the information gentlemen, My first consideration is a third party cover for Rs. 200,000 for which the premium will be about Rs. 2,000. I could also try undervalue the car if I'm going 3rd party. Just wanted to check if a comprehensive cover would be worth it given how frequent accidents are in these congested roads. Pros and cons of comprehensive cover, specifically with regards to vintage cars. @Twin Turbo Sir, I meant to say young timer cars. (Young timer cars are the old cars which are not yet considered vintage. My project car would be considered a young timer car. Old timers are vintage ones. Ford model T is vintage) I'd happily call myself young. But not immature, reckless, kind of young. I'm in my mid twenties Given how the comprehensive policies don't adequately cover older cars that well, I wanted to make sure that it's the right thing to do.
-
The negative offset ones are the infamous "boku alloy"?
-
ADVICE NEEDED Insurance for the car expires in December. So, I'm searching for a good policy now itself. I have not yet decided on to get comprehensive or third party cover. All I need is the best bang for the buck. First, I went to CE¥L!NC0. They refused to insure saying it is too old. Then I went to $R! L@NK@ insurance. A guy had a look at the vehicle and said it can be insured for Rs. 300,000. A full option would be around Rs 10,000 and third party around 3,000. They did not have any special policies for vintage cars. The comprehensive coverage will cover the full value if parts are replaced with reconditioned parts or 30% if brand new parts are used. Plastics and rubber are not covered. Since I'm planning to restore this (over 1-3 years), will a comprehensive insurance for this amount be worth the money or am I better off with a third party cover? I would like to hear your comments on selecting a suitable cover. Are there any specific insurance policies for vintage / youngtimer cars in Sri Lanka?
-
Thanks for the help gentlemen, I still failed to remove the dashboard. Once all the screws are removed, I tilted down the steering column and gently tugged at the dashboard. It came loose. I unplugged the connectors in the wiring harness in order to completely remove the dashboard. Looks like some of the wires run all the way to the engine bay without connectors. So I could not remove it. The driver side AC went was not blowing when I bought the car. While removing the dashboard, I found that a part of ducting had removed and fallen in to a mess of wires. So I want to to fix it as well. I'll give it a try after I get the Haynes manual. The wiring system is a mess. All the fuses in the board are shorted out with a wire. I'll have to start from fixing the wiring. There's only an AM tuner in the stock radio. I'm planning on stripping the "innards" of the AM tuner and putting in something like an Arduino with Bluetooth, FM, GPS, voice recognition function in to the stock AM tuner "shell" and remap the buttons and volume and tuner knobs to function with the Arduino.
-
UPDATES 1. Brake liners replaced. I might as well say brake liners inserted give how worn out they were. Had to replace one pair of shoes as well. Surprising the hubs wer good. 2. Passenger side front wheel didn't roll smoothly it was very tight to turn. Problem was not correted with greasing the bearing. So I had to replace it with a reconditioned one. 3. Topped up brake fluid. Again, these are not exactly part of restoration. Removed the seats and carpets to detail the interior. Wan to remove the dashboard as well. I'm stuck at removing the dashboard. Appreciate if anyone can describe how to remove the dashboard. There's quite a lot of rust in the floorboard. So I will repair this before putting back the carpets and seats.
-
Yes. With a 0.9 big head. The rubber washers were missing in the old one. Thank you.
- 189 replies
-
- 1
-
-
- mitsubishi
- a72v
- (and 7 more)