Davy
-
Posts
3,924 -
Joined
-
Last visited
-
Days Won
259
Content Type
Profiles
Forums
Events
Blogs
Gallery
Everything posted by Davy
-
Pretty sure that list isn't right. From where did you get this? You should include a reference if you are quoting from the Internet. As I have mentioned above (and The Stig has reiterated as well), Mercon 5 isn't the same as MV. Using Mercon 5 on a transmission intended for MV can cause premature failure of the unit.
-

Lancer Or Axio? Update: Bought A Lancer! (Aka The B.r.a.t.t. Thread)
Davy replied to Bracket's question in Car Buying Information
Welcome to the forum. Haven't seen @Bracket around for quite some time, but there are several other Lancer EX owners on the forum who will be able to help. Are you looking to buy a Lancer? -
Okay, original tyre size. So the diameter of the rim is 14". From the way the tyre looks in that photo, I assume the width of the rim is 6" or 6.5" max. Both are within the safe range. There's one more measurement that's not in your photo and that's the offset of the rim. It should be embossed on the mounting surface of the rim, so you need to remove the wheel from the car to see it. If it's not embossed/engraved, then you need to manually measure it. It's the distance from the centreline of the rim to the mounting surface. More info here. You can search in YouTube how to measure wheel offset. It needs to be in millimetres. Why this needs to be checked is because if your alloys have a lower offset that causes the wheels to stick out than original, it can touch the wheel arch. Did this start happening recently or ever since your installed the new wheels /bought the car (assuming with current wheels)?
-
Right. What's the size of the set of alloys (diameter, width and offset) and tyres? The originals are (14" , 6" wide and +40 mm offset with 185/65R14 tyres). So if your wheels are more than 7 inch wide, it might be due to the wider wheels. And where does the wheel touch exactly? Is it the top edge of the wheel arch or the top inside of the wheel well?
-
Do you have aftermarket alloy wheels installed? If the shocks are good, using a set of wide wheels with an incompatible offset can be the cause for why it rubs. Does it always rub or only when you have a few passengers at the back? Or is it only when you go over a pothole or something?
-
Mitsubishi Lancer Cs1 2003 Gl Central Locking
Davy replied to shaba's question in Mechanical problems
If you mean that it locks the doors automatically after a certain time, then I'm sure that is a setting that can be turned off or changed. Take the car to the place that did the installation. -
Welcome to the forum! I think you'll be happy to know that we have quite a few Demio owners on the forum. From what Colonial has suggested, it looks like you have a regular automatic transmission and not the CVT variant. MV ("M Five") is the recommended oil by the manufacturer. If you are using a different brand of oil, make sure it's MV. Also keep in mind that "Mercon 5" is not as same as MV. In my experience, Colonial does a better job, but then again this is just an oil change and there's little room for error. You have to use 3320 type CVT oil if the transmission is CVT. @mazda2, FYI, you can find photos of the cars of Demio owners in this thread + other information (manuals and stuff etc.)
-
OP probably never hit the 40 GB limit all these years, until now.
-
I personally think that the new packages are a better deal than the old 512 kbps connection. They do have fibre also now, so you can go 100 Mbps also and I think that is pretty competitive even by international standards. While I understand that you are fighting for your right to have what you initially signed up for, let me show you how the new package might be beneficial to you. With the 512 kbps connection, if you have your PC turned on 12 hours a day, the maximum amount of data you can download within a month is about 69 GB. 512 kbps (kilobits/s) = 64 kB per second. If we assume that the SLT service is operating at 80% speed consistently, the data rate you will be getting is about 50 - 55 kB per second (Assume 52.5). For a month: 52.5 x 60 seconds x 60 minutes x 12 hours x 30.5 days in month = 69,174,000 kb = 69 GB approx. From what I can see in SLT page, their new packages offer a 60 GB package (30/30 split between peak and off peak). So if you use it wisely, your overall experience will be much much better. Just my 2 cents.
-
I remember this being discussed on the forum before. As The Stig said, old news. I too upgraded at the time because I thought the faster connection would be a better deal although it has a download cap. I simply can't imagine using a 512kbps connection these days.
-
How much free time do you really have to be doing all these experiments? I thought your "mechanic" used his stethoscope and found that the noise is coming from the booster? Good mechanic you've got there. Symptoms of a bad booster are usually quite obvious and you can tell without taking the booster apart by simply doing the aforementioned test. It's just a waste of time taking it apart. To be honest, I'm not surprised it doesn't work still. Combining parts from two defective units to make one "working" unit doesn't guarantee that it will work. At this point, I think your best bet is to just find a new proportioning valve. If you know the part number, you should probably try Amayama or Partsouq. These are your next steps IMO: 1. Find new proportioning valve and install 2. Inspect rear brakes and ensure handbrake mechanism is okay and working. Do a general inspection of all wheels. 3. Bleed brakes (all wheels starting from the furthest wheel to the master cylinder to the closest one. or follow manual if you have one). Use new brake fluid. 4. Check for vacuum leaks 5. Perform booster test again (quoted post above) 6. Test drive
-
-
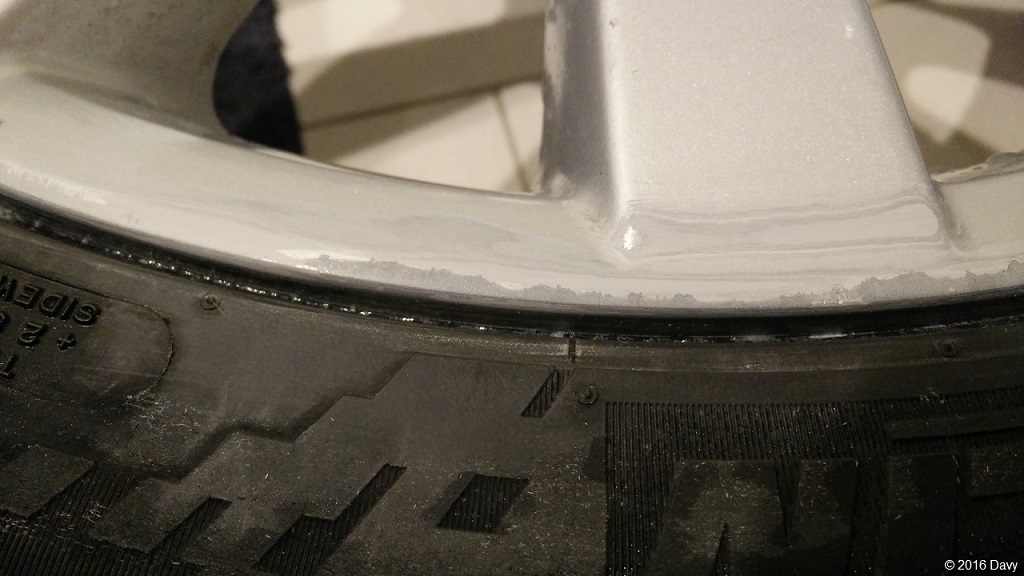
Continuing the painting... I used some playing cards to prevent overspray onto the tyre. This was much easier than using masking tape and having to mask many times after wet sanding. The should be tucked in the gap in between the tyre and the rim, they stick out and don't touch the edge of the rim at all, so they don't stick to the rim when painted over. Apply a tack coat of spray filler primer and leave to dry. Apply a heavier coat of primer next and leave to dry before wet sanding. Make sure you clean the rim well with a wax & grease remover before applying primer. This is after: Next, use the 400 grit sandpaper and start wet sanding the primer. I sanded the primer all the way down and at the end you can see how it fills in small scratches dings. Use the 800 grit wet sandpaper next and sand away the very little scratches. After this step, the surface of the rim should be really smooth. Now the surface is ready to paint. Give the rim a good wash and let it dry. Apply wax and grease remover again to remove any primer left on the surface from sanding and clean the rim well. Apply a light coat of paint (I masked the rim again with playing cards to prevent overspray). Follow instructions on the spray can and apply 3 to 4 coats. Make sure you rotate the rim between coats and during painting to make sure you cover the entire surface. The colour I picked was a metallic gunmetal grey. This is the colour that is used on the rims for the 2014+ RalliArt. Looks way better than silver IMO, so went for it. This is after the first coat: The centre cap also had to be painted in my case and I wanted to leave the embossed Mitsubishi logo in silver as this is how it is in the newer models. So I masked the emblem carefully. This took quite a lot of time. After heavier second and third coats, leave the rim to fully dry for a couple of hours and then apply a heavy coat of clear. You can skip this step if you don't want the extra shine, but clear will also act as a protective coating for the paint when rocks and debris strike against the rim. This is the end result. I am thrilled with the result. This is the spot I took as an example to repair in the first post. No sign of kerb damage! An optional cut and polish also can be done to give it that smooth and extra shiny look. I haven't done that yet. I think I'm going to leave it like this. At least for now.


- 15 replies
-
- 4
-

-
- kerb damage
- diy
- (and 6 more)
-
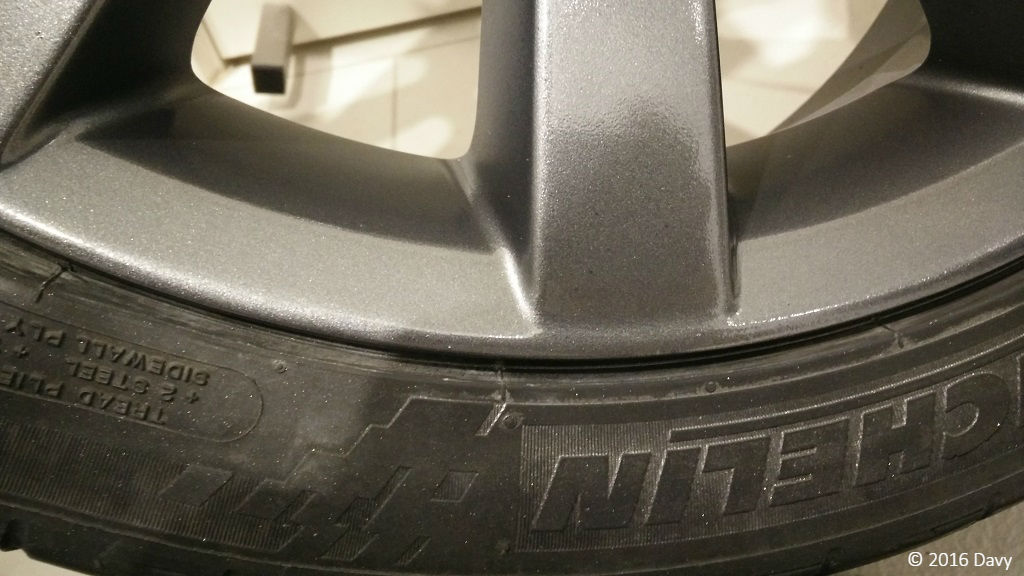
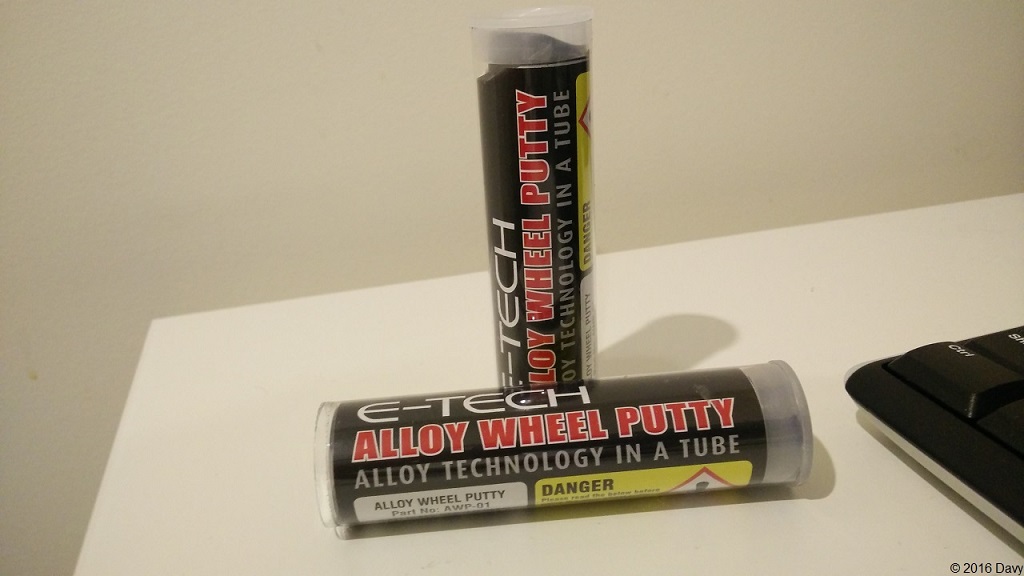
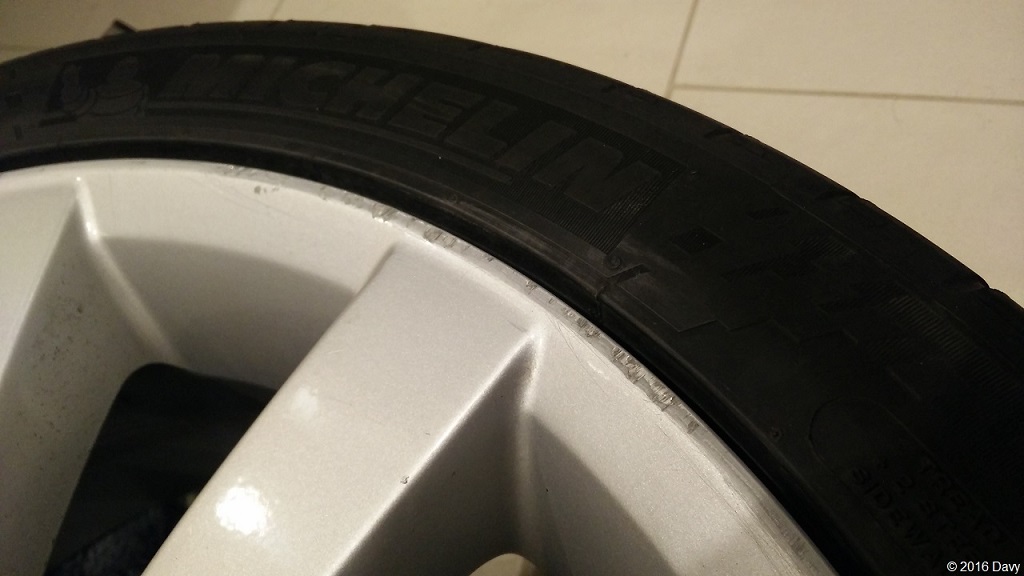
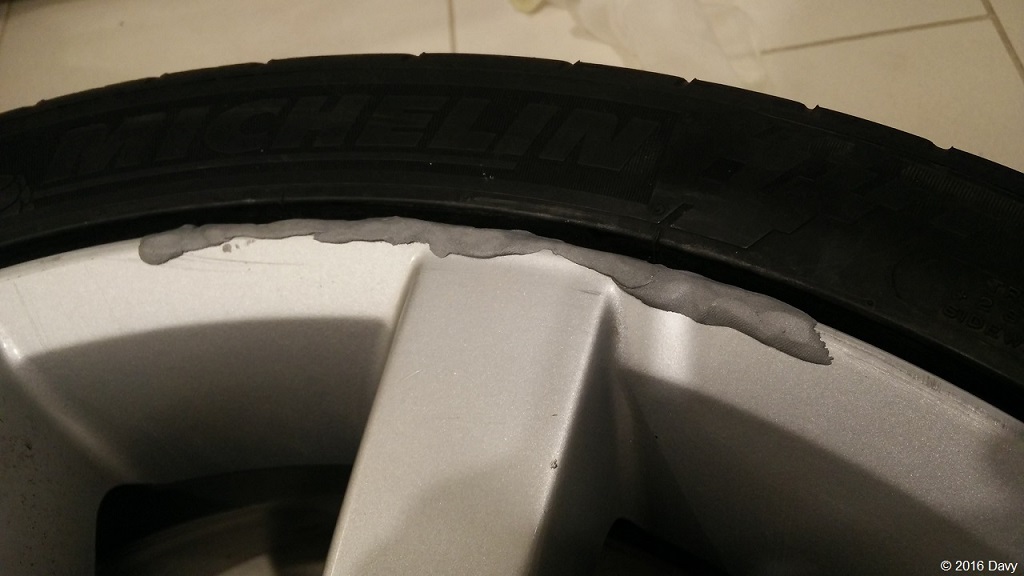
Hi Guys, Posting a DYI again after quite some time. After I got new wheels for my car, the stock rims have been lying around and I thought of repairing them. Two of the wheels had nasty kerb damage thanks to the previous owner who was careless when parallel parking (wheels with the most damage were the ones on the left). When I was looking for a set of used BBS rims for my car, 90% of the rims I found had kerb damage. So the problem is pretty common and getting these professionally repaired and resprayed can cost a lot. If you are keen on doing this on your own, you might find this post useful. Things you need: Alloy wheel repair putty (eBay Link? This is a specially formulated putty to work with alloy wheels and I found it to be very effective. Sandpaper (200, 400, 800 wet, 1200 wet) Masking tape, scissors, old newspapers to mask Clean rags Water for wet sanding Wax and grease remover/Degreaser Old toothbrush Rubber gloves For illustration purposes, I have selected one area of a rim where you can see kerb damage. This is what I’ll be working with. Step 1: Prepare the surface for repair Using degreaser, toothbrush and a rag, scrub and clean the area and get the grime out of the damaged area. As you can see from the above photo, there’s a lot of grime in there. Next, use the coarse dry sandpaper to remove any material that maybe protruding out of the surface of the wheel. We need a smooth surface and the alloy wheel putty needs to fill in the scratches. The following photo is after sanding and washing the area. Step 2: Apply the repair Putty The putty is a stick and has the texture of crafting clay. It’s a two-part putty and you need to knead it between your fingers for the two parts to mix up (wear gloves for protection). Then roll it on a flat surface to form a very thin bead. Place the bead on the damaged area and press firmly. As the two parts start to react, you can feel the putty heat up. It hardens up rock solid within about 15 minutes. You can start sanding in about an hour. Remember not to apply excessive amounts of putty, because a lot of effort will be needed to sand it down if you do. The stuff is a bit harder to sand than regular body filler. This was the first spot I applied the putty to, I applied a little too much and had to spend a lot of time sanding it down. So once again, VERY little. This photo is probably a bad example of how to apply it, but you get what I mean. Step 3: Sanding Start with 200 grit dry sandpaper and work your way to a smooth surface. Use masking tape to prevent damage to the tyre. If you plan to do only a touch-up and not paint the entire wheel, you might need to mask the wheel as well, to avoid scratching it up. Run your bare fingers on the edge of the rim from time to time and feel the smoothness, you should be able to tell if there are imperfections. When the surface is smooth, move to wet sanding (first 800 grit and then 1200 grit to remove the fine scratches). If you plan to paint the entire wheel, water sand the wheel with these two papers so that the surface has a “blunt” texture. The new paint will stick better this way. After the sanding is done, the surface will look nice and smooth, no more kerb damage! It’s important to sand the putty down so that there is no excessive putty between the tyre and the wheel, you can insert the sandpaper into the gap and sand away, the original curve of the wheel needs to be maintained. As you can see from the above photos, I have sanded the putty all the way down to the rim so that the only bit remaining is the putty that fills the scratches. This is exactly what we need. If you feel like you need one more pass, go ahead and repeat step 2 and 3 again. This is it for the repair. All that is left now is to paint the area. I will cover that in a separate post. Let me know what you guys think and if you know of other ways of DIY methods to repair wheels. Thanks for reading! Cheers!


- 15 replies
-
- 8
-
-

-
- kerb damage
- diy
- (and 6 more)
-
Already discussed in detail. Search the forum.
-
Vacuum usually goes away immediately after the engine is turned off. Anyway, to determine if there is actually no problem with the booster, before you take things apart, perform the following test explained by Rumesh88:
-
Holy sh!t!
-
Is it just me or does the side body sculpting on the Caravan look like two massive dents?
-
The booster is a sealed unit and replacement is the recommended option if it's faulty. Apart from the noise you hear, is there a lack of power assistance or issue in the brakes?
-
Quite normal after the rack has been machined. It might loosen up a bit with time, but not to how it was originally. The only thing you could do to restore it is to install a new rack IMO.
-
My opinion is that drivers in Sri Lanka who consider them to be obedient drivers sometimes don't even know that they are actually not that different from the rest of the herd. So I think @Kavvz's "Category A" needs to be split into two: A1: Drivers who are REALLY saints A2: Drivers who THINK they are saints Every time you didn't give way to the vehicles approaching a roundabout from the right, you were wrong. Every time you let half of your car sit on a junction box, you were wrong. Every time you let a portion of your car cross the "give way" line at a junction or traffic light, you were wrong. Every time you ignored the pedestrian waiting at a crossing, you were wrong. Every time you thought you could follow that ambulance to get to your destination quicker, you were wrong. Every time you went through an amber when you could have safely stopped, you were wrong. Every time you didn't indicate (or indicated too late) when you are turning or switching lanes, you were wrong. One can obey every single road sign, speed limit and traffic light and sure, that will get you out of trouble with the cops, but they can still be a retard if they're are not courteous. Honestly, I think only a handful of drivers are courteous. I was actually stunned when I came to Sri Lanka in March and drove my father's car for the first time after 2 years of driving abroad. I realised that you require a certain style of driving in Sri Lanka and I've lost it after 2 years of being away. Within just 10 minutes of driving, I had to stop by the side of the road at Athurugiriya junction and catch a breath because I had to remind my self that I was back in Sri Lanka, driving among retards (not all, but the majority). People don't realise they are not courteous - it just comes naturally to them. For example, if you need to cross an un-monitored junction (no cop, no traffic lights), you just need to slowly creep forward until you are through, otherwise you will not get anywhere and the drivers behind you will just drive you mad stomping on their horns. In theory, that is wrong, but that is just how it is because no one else will give you way! My point is, we can have all highway codes and rules written on paper. But abiding by them doesn't make you obedient. It is that, plus courteous driving that makes you a good, obedient driver. So I think the real question is, how many of us are really courteous?
-
Glad it's working again. This is why the order of bleeding is very important. There might have been some air trapped in the RL line that caused that wheel to lock up.
-
I can't believe the fairy tales mechanics tell these days. Did you see the mechanic take the pistons out? That damage on the piston could have not been causeb by excessive brake oil pressure. While your mechanic was trying to take the pistons out of the valve body, he must have inserted some sort or metal rod through the top 4 holes push the pistons back. That's the only logical explanation I see for the damage IMO. As Rumesh said, these vales rarely become defective. What exactly was the "imbalance issue" you had? Left-right or front-rear?
-
That actually looks to me like the gap between the aluminium core and the side tank of the radiator. The blue circular thing is the drain plug. So it might not be a leak in the expansion tank, but the radiator itself. In any case, you need to get it checked out as others have mentioned. A good radiator shop with the ability to perform a pressure test should easily be able to locate the leak.
-
Not the same wheels. The ones on the Mitsi are 10 spoke 18 inch 7J. The Allion ones are 8 spoke, probably smaller in size too.